

Learn to clean Solar panels
In this module we'll be discussing new cleaning opportunities that have been presented with the extensive growth in the water-fed pole work! The process of water filtration and water fed pole components are the same, so it might be worth a review if you've done the water fed pole module. The technique for solar panels is slightly different than windows, but essentially interchangeable. Assuming many solar panels are on roofs, or elevated surfaces, supporting modules would be:
- Ladder Work
- Roofs & Fall Protection
- Safety Introduction

Safety Meeting
While there is a wide spectrum of safety concerns while cleaning solar panels, here is a solar safety meeting to read through. Regardless of what you're taught, if something doesn't look right on a job, stop the job immediately. If the panels don't look up to code or there's any kind of safety concern, do not proceed.
Types of Equipment
-
There are a few different ways companies are cleaning solar panels. Since solar technology is still being developed things are constantly changing and improving. Most window cleaning companies start with a water fed pole because they already have the technology setup within their company. This module will focus on the water fed pole method, since this is an add on module to window cleaning training. Some of these methods and principals will still apply to cleaning solar panels however you should thoroughly read through any manufacture's recommended maintenance, processes and procedures.
-
-
Water Fed Pole
Water fed poles are a derivative method from cleaning windows. Using the same technology, you can scrub and rinse solar panels for a spot free shine. This module is only covering the water fed pole method. The main upgrade most WFP systems get is a wider brush to cover more surface area. -
Robots
Robots are a newer technology in cleaning solar panels. These usually ride across rows of panels while scrubbing and rinsing them with deionized water. The technology is expensive so be sure you read through your entire manual to be sure you're using it safely and correctly.
-
Rotary Brush Tools
Rotary tools are tools that spin from water pressure or motors. It's important these tools are running with the right amount of pressure for the best quality of work and longevity. The rotary function saves the user from body fatigue since the spinning is doing the scrubbing while it simultaneously rinses with deionized water.
-

Frame
The frame is usually aluminum and covers all the layers with a seal around it. Many companies that offer pest control will drill into this to put in nets. Do not attempt this unless you've been properly trained.
Tempered Glass
Tempered glass is heat treated glass that is stronger, and if it breaks, it breaks into chunks instead of sharp shards. The glass is heated and then cooled rapidly. The exterior glass cools faster than the interior which creates compression on the exterior and tension on the interior. The pushing and pulling keeps the glass harder and causes the chunks.
Solar Cells
The solar cell is an electrical component of the panel that converts physical light into electricity.
Encapsulants
The encapsulants are used to provide adhesion to the solar cells. Encapsulants need to be transparent, stable in temperature swings, and able to handle high UV exposure.
Back Sheet
The back sheet is used as a panel insulator and to protect the panel from the elements.
Junction Box
The solar junction box is where all the wiring components are located. This box protects wires and connectors from the elements. If you notice any damage, openings, or loose wires, stop the job immediately. Anytime electrical sources could be exposed (either junction box or damaged panel) there's a serious hazard of electric shock or electrocution. -

Types of Solar Cells
There are several types of solar cells you'll see on different jobs. This should not affect cleaning. These different types can range based on efficiency, cost, and size based on the customer's need. Solar is still evolving quickly but these are three main panel types you'll come across. Remember that regardless of panel type, we're still dealing with the same hazards that we went through in the safety meeting. -

Defects and Damaged Panels
With any industry, there's always a cheaper brand. This usually leads to quality issues, defects, and more. Regardless of quality, solar panels are exposed to UV radiation, temperature variations, weather, and other elements daily which affects their longevity. Here we'll go over different issues that are common with solar.


-
Delaminating Panels
Delaminating panels is the process where the module layers start to separate. This process happens really similar to a broken or failed seal on a window. This is usually caused by moisture. When the interior components are exposed to moisture either through a bad seal, broken frame, or cracked glass the layers start to separate causing the cells to fail. This can also lead to back sheet failure from moisture sitting on it.
-

-
Micro Cracks or Snail Trails
Micro cracks in the solar cells are commonly referred to as snail trails. These small cracks are a sign of solar cell damage. This usually happens when water vapors get into the laminate. These cracks will usually get worse and should be brought to the customer's attention. Most manufactures or installers will warranty this for the original owner so letting the customer know might give them the opportunity to get it fixed before it causes more issues. These cracks make it difficult for energy to traverse, creating heat and eventually hot spots. -

-
Hot Spots
Solar cells generate power from sunlight. When the cells absorb light to generate a current, heat is created. When there's extensive resistance for the current usually from damaged cells, joint issues, bad solders, poor material, etc. the trapped current creates heat. This looks like burn marks on the panel and they're known as "hot spots". These can lead to overheating and even fires. If you notice burn sections on the panels, then have the customer get a solar company out to inspect. -

-
Broken Glass
Do not clean, or touch broken glass.
The glass on the panels is the first line of defense to protect against weather elements like rain, hail, dust, and even lost golf balls. Broken glass will significantly diminish the output of the panel if it's even functioning at all. This will most likely let water into other parts of the panel causing more damage. This could cause issues for an entire array of panels. Touching a panel like this could expose you to serious electric shock or electrocution. -

-
Thermal Inspections
Thermal inspections have become the latest technology for properly inspecting solar panels. Thermal cameras allow the user to see different levels of heat. When inspecting solar arrays with these cameras you're looking for any type of anomaly in a system. Any kind of difference in heat could indicate a sign of early cell damage or an issue in the string.
A string issue could be a bad connection or cable problems.
Doing this even on new panels is helpful to confirm things are working properly and to document issues. Ongoing inspections will help keep track of panel degradation and alert customers quickly to any issues or concerns. While you can't completely diagnose with thermal inspections it allows you to pinpoint a potential issue. Document this and notify the homeowners to have the installer or manufacture out to pinpoint any potential issues. In this graphic you'll notice the heat anomaly present from the heat in the cells that look yellow.
-


-
Water Fed Poles
If you've gone through the water fed pole module and have a good understanding of water fed poles, hazards, water filtration systems, plumbing basics, PPM measurements, TDS meters, etc. then some of the following might just be a refresher for you. Make sure you still go through all the content as a reminder and to help you on the test.
You might have seen the term WFP referring to water fed pole throughout different modules. In simplest terms it's a pole with a brush on the end, where purified water is fed through a small hose inside of it. Some customers/professionals don't like it and some love it. It's preference but either way it's an incredible resource when it comes to safety and efficiency. It's not a quick or sloppy way to clean a window, it still takes time, practice, and precision to get a job to come out right. It's not good for post construction jobs. Its best on windows that are done on a regular basis and difficult to reach windows. You can also use the same setup and techniques you'll see below to clean solar panels.
You take clean water, send it through a purification process to remove minerals. This process is referred to as deionization. Deionization is removing any minerals from the water. All water has minerals in it which is what causes hard water on surfaces. This is why you dry your car off or why you see marks on everything a sprinkler hits. When you go to a car wash and put it on the "spot free rinse" you're getting deionized water.
Vocabulary
Mineral
A microscopic piece of rock.
Parts Per Million(PPM)
Parts per million is the measure of one part mass to a million parts mass.
Total Dissolved Solid (TDS)
Measure of the minerals in water by parts per million, PPM.
TDS Meter
A TDS meter which can be handheld or inline to measure water ppm in and out. In a sentence: This water has a total dissolved solid content of 17 parts per million. This means your TDS meter is measuring 17ppm in the water.
Deionized
To remove ions or ionic minerals from a substance, usually water.
In simplest terms minerals are broken down pieces of rock. Some of these minerals are known as salts, aluminum, magnesium, iron, calcium, sodium, potassium, and many others. You might recognize some of these minerals because they're actually mined to produce things we use every day. There are certain areas of the world that might have really high iron in their soil, which would make it orange. When you get water from the ground in that area, it would have high amounts of iron minerals in it. So if you washed your car, hosed a driveway, or spray off a window, when the water dries you're left with microscopic iron minerals. Just as an iron metal would rust, you'll get rust on your car, driveway or window if the mineral content was high enough. The mineral will penetrate the surface and cause permanent damage. That's why we filter water and we're left with the purest form, no minerals, deionized water.
Water attracts minerals which is why WFP works so well. When the pure water hits the glass, it absorbs the minerals/dirt off of the glass and dries spotless. The cleaning process is a little more complicated and skilled than that but we'll get into that soon. Measuring minerals in water is a fairly simple process. The measurement is referred to as total dissolved solids or TDS. For drinking water an ideal TDS would be about 25-150 PPM, anything past 500 PPM could be dangerous. These minerals would give the water flavor and give your body certain minerals it needs. If you're drinking water from 0-24 PPM, this could actually be unhealthy and be pulling necessary minerals from your body. Any water over 150 PPM is considered hard water, will cause damage, and should be purified. That number could be significantly higher if a customer was on a well. Below are parts per million recommended for a satisfactory outcome. Even if water is soft it can still cause damage to surfaces. Soft water is not demineralized water or without mineral. Even if the water is deionized it becomes hard as soon as it touches surfaces with minerals. We'll get to technique later but the water needs to be used strategically to not grab mineral and run down the glass.
Ideal Measures of PPM
Glass - Less than 10 (Ideally 0)
Car Paint - Less than 50 PPM
Building Surfaces - Less than 60 PPM -
Filtration Process
There are a lot of ways to do multi stage purification processes. Deionization (DI) tanks work like magnets and pull out ions through negative and positive charged DI resign. An ion is a mineral that attracts to either a positive or negative DI resign. This process is deionization. Some setups will have a negative resin tank and a positive resin tank, or just a single mixed resin tank to remove the ions. In areas with extra hard water or just to make DI tanks last longer you can add a reverse osmosis (RO) tank which is basically just an extra filtration process. See the filtration process to understand each filter and its purpose, the harder the water, the more extensive of filters you'll need. -

Hard Water In
Input this into the customer's home or business.
Sediment Filter
This filter removes small physical particles.
Carbon Filter
This filter removes chemicals (usually from city purification) like chlorine.
Reverse Osmosis
This filter uses a semi-permeable RO filter to remove salts and up to 90-95% of minerals. Reverse osmosis filters send the water through tightly compressed membranes to remove minerals. Water that doesn't make it through drains out through another line as waste water.
Cation Tank
Positively charged DI resign to attract and remove negative ion minerals.
Anion Tank
Negatively charged DI resign to attract and remove positive ion minerals.
In-Line TDS Meter
Measures the PPM in the water as it flows. You can also use a handheld meter to test water coming in and out.
Notes:- DI resign can also come mixed which means it will take out both positive and negative ions. This is known as mixed resign.
- Inline TDS meter is measuring the PPM going in (hard water) and out (deionized water). The water needs to be under 10PPM coming out, preferably OPPM for cleaning windows.
- The hose reel brings the DI water around the project. A quick connect is used to connect the water fed pole to the hose. The quick connect should also have a shut-off valve so you can turn on and off water flow. Remember it cost money to filter water, plus the water itself, so don't waste it.
Water goes in on one end and comes out pure on the other. If a customer is out of city limits you can assume they're on a well and their water is much harder than purified city water. Sometimes tanks seem bad or PPM might be high out there and then you come back into town and your meter is much lower. Don't always assume your tanks are bad if the water quality going in is horrible. Consider using the belting method it this is an issue. If your TDS meter is showing high PPM in town then your tanks (resin), is probably bad and needs to be replaced. Expect your output based on what your input is.
A part of this equation is water pressure. If your water pressure is incredibly high then water could be blowing through these tanks without actually getting properly filtered then splattering all over the window/building, leaving mineral stains. Water pressure is measured by pounds per square inch or PSI. A typical PSI on a house is about 40-45 psi. This is usually controlled by city pressure, but once again, people on wells are on their own pressure system. Sometimes pumps are aggressively pushing water water at a really high psi. In this case just turn the hose bib a fraction of a turn to let minimal water out. Most typical filtration plumbing won't handle psi much over 75. A typical house psi will get you up 4-5 stories on your WFP no problem. If you need to go higher consider a demand pump to pump your water up at a consistent psi when needed. A pump would also be needed if you are supplying water for a customer to pump it out of the tank. If water pressure is regularly too high in your area, you could ad a pressure regulator to control the PSI coming in. -

-
Hoses & Plumbing
When connecting your hose to the hose bib, make sure there is a sealing washing inside the female end of the hose connection. Sealing washers can breakdown or split overtime so this is the most likely reason for a leak between the hose bib and the hose. If the hose is leaking between the connector and the hose then it's most likely the tightening clamp. The tightening clamp needs to create a suction around the hose connection. If the hose splits or frays around this clamp it could cause a leak. First try to tighten the clamp in case it was loose. If it's still leaking then you can cut your hose down to move the clamp. If everything is in good working condition then a hose should be able to connect by hand tightening. If there's wear or leaks you can use channel locks or a wrench to tighten things up. On tightening clamps you can also usually use a phillips or flathead screw driver. -

If your hose is split or damaged near the connections you might need to cut it and move the connectors down. To do this you'll want to loosen the tightening clamps only enough to slide them down the hose. After this you can cut the hose down to the desired length to remove any imperfections or leaks. You'll then need to cut the remaining hose off of the connection barbs. The barbs need to have the remaining hose cut off of them. Now slide your connection back into the freshly cut hose and move the tightening clamp over the barbs. If the barbs aren't going in easy first make sure you have the right size. If they're loose then then won't work. They should be tight enough not to pull out but still take pressure to get them in. You can also use soap to help lube the barbs and slide them in. On hoses that are harder or plastic sometimes boiling the hose end will help you get the barbs in by softening the hose. Remember that your hose will be hot. Once the barbs are fully in, tighten your clamp to create a seal around the barbs and test the hose for leaks.
-


-
Anti-Theft Hose Bib
Pair text with an image to focus on your chosen product, collection, or blog post. Add details on availability, style, or even provide a review.
-

-
Cam Locks
Cam locks are hose connections often found on commercial properties or industrial facilities. They're designed for high pressure so consider this if you're hooking it to some of your equipment. To open the cam locks release the side levers by pulling the pins and separate the connections. To connect the hoses back together insert the male end into the female end with the levers in the open position. To lock the connections push the levers down. If the levers aren't securing then the connections might not be properly seated. Release them and try again until the levers completely lock down. -

-
Hose Reels
You'll most likely come into contact with hose reels on this job. This could be garden hoses, WFP hose, or high pressure hoses.
Unreeling
When trying to reach a project you should always start with the hose completely out as far as it will reach and work back to starting. This will help you avoid yanking the hose or getting it caught on anything. Pull the entire length to the closest corner, second corner, and so forth.
Reeling Up
When you're reeling the hose back up, get the entire hose untangled and laid out in the immediate area. Grab the hose with a towel in one hand while rolling with the other. The towel will not only protect your hand but also clean the hose as you roll it up. -


-
WFP Plumbing
These are the two main connections on a water fed pole. The female end has a turn off valve to shut off your water flow. To release the male end you need to pull back on the female end and then pull out the male end simultaneously. The male end will push right in when connecting. If you're getting leaks here then try replacing your O ring. If you're getting leaks between the turn off and delivery hose then try replacing the sealing washer between the two. -

-
The hose delivering your deionized water from the filtration to the wip hose should typically run 3/8" to 3/4". Typical American garden hoses are 5/8". Your 5/16" hose should be long enough to run through the pole fully extended with about 20 additional feet to connect to delivery hose. Running a 5/16" hose all the way back to the filtration could cause either high pressure issues or a lack of water delivery. The diameter reduction will help the user control the water pressure and volume with shut off between the hoses.
-
Water Fed Pole (WFP)
Water fed poles have been breakthrough in the window cleaning industry for safety, efficiency, and quality. Your WFP is the delivery system of the deionized water to the glass. Usually glass is coated with debris that need more than a rinse, so you'll have a brush or scrubber at the end of your pole. Poles range in a variety of different textiles but carbon fiber seems to be the latest industry standard for lightness, being rigid, and strength. Poles can extend up to several stories but the farther you go up, the less rigid the pole will be. If you don't need the entire length, extending each section partially will keep the pole more rigid. You can also adjust the angle of your scrubber to keep it flat on the glass.
WFP Hazards
Here are some safety tips when working with poles:- Assume that any pole conducts electricity, for safety concerns. We're trying to create good practice and habit. Remember that water conducts electricity, even if the pole doesn't. Do not use if there is lightning or near electrical sources, especially overhead.
- Poles are top heavy. Keep that in mind when you have the weight of tools on the end. They can end up slamming into a window if they get momentum.
- Make sure any equipment on the end of the pole is secured. Something could end up falling. Your tools should be compatible with the pole and either screw or click in.
- Keep your hands and pole dry and free of dirt. Dirt can jam up the pole. If you have a leak in a water fed pole, fix it so it's not running down your pole.
- Don't use a water fed pole if the water is freezing on the ground. This could create a slipping hazard, especially in a walking path.
- Never leave a pole, whether extended or unextended, against a building. If you must leave, leave the pole unextended and out of the walkway, but preferably back on the work vehicle.
- If you need to pick up an extended pole then put the handheld end against a wall. Grab the other end and walk it up while putting pressure against the wall. You can also have a coworker hold the handheld end while you walk it up. Lift with your legs, not back.
- Do not horseplay with poles, use only for the intended purpose.
-

Water Fed Pole Vocabulary
Extension Pole & Clamps
This part of the pole extends and descends to reach the desired length. The clips can be tightened if your pole is turning when you're working. Extending each section partially will keep your pole more rigid if you don't need it fully extended.
Push to Fit Fittings
This small connection will help you adjust the jets on your brush so you can get the desired rinse.
Water Fed Brush
The brush is used to scrub the glass. Common brushes are synthetic materials, boars hair or a combination (hybrid) of the two. There are also scrubber pads to break down debris on the glass.
Angle Adapter
The angle adjustor is important to keep your brush against the glass. You want as much of the brush to penetrate the glass as possible. Some manufactures also make these adjustors with a swivel on them.
Quick Connect
The quick connect attaches the thin 5/16" hose to a larger delivery hose.
After the glass has been scrubbed thoroughly, the final step is to give the glass a complete rinse. Rinsing too high above the window can rinse minerals from the frame or siding, causing drips on the glass. Your WFP has small jets or a rinse bar at the end to deliver the DI water in different types of rinses. Some of it is preference, but sometimes different rinses are needed on different types of glass. -

If your jets aren't working as designed, there could be debris lodged in them. Try disconnecting your hosing to clear the jets. The easiest way to clear the jets is to push back up and through.
Pole Adjustments
Before you start scrubbing you'll want to get your pole adjusted to the correct angle and length. Since solar panels are flat, sometimes it can be difficult to get a good amount of pressure on it. A good trick for this is to extend the closer portions of the pole, allowing the un extended lengths to provide downward weight onto the panel for a better scrub. This also makes the user's end of the pole much lighter. Now you'll want to adjust the brush to be flat onto the panel while scrubbing. This angle can vary on a lot of things like:- Angle of panels
- If user is above or below panels
- User's Height
- Extended Pole Reach
- Location of panels
-
Scrubbing Patterns
It's really important to use a scrubbing pattern. Just like windows, once these get wet, it's almost impossible to see what is still dirty. Following a scrub pattern will ensure that the panel has been completely scrubbed. If you're not scrubbing the entire panel then you won't know until they're dry, and on a cold day this could be awhile.


-

Up & Down
Scrub your panels up and down, starting on the bottom half, followed by the top half.
-

Swirls
Scrub your your panels in swirls consistently throughout the entire panel.
-

Rinse
up-Rinse your panel thoroughly so the last thing to touch the panel is deionized water.


-
Pro Rinse Tip
It can be difficult to lift you pole to get a good clean rinse on the solar panel. Instead of entirely lifting the pole while rinsing simply tip it over as you rinse. This will help with body ergonomics as well as better quality of work. As your bush is tilted, simply slide it onto your next panel. -
Order Of Operations
Side View
Whether you're starting on the top end or bottom end you should consider starting in the same area. Take a look at the numbers below. You always want to start on the high panel, based on the way water and dirt will shed off. If you clean lower panels first, then the grime could run down your previously cleaned panels. Once the panels get wet, it's very difficult to see what's still dirty. For this reason, we recommend starting on the bottom half of the top panel. This allows you to see the dirt still as you're scrubbing your way up the panel. See the graphic below on steps 1-6. -


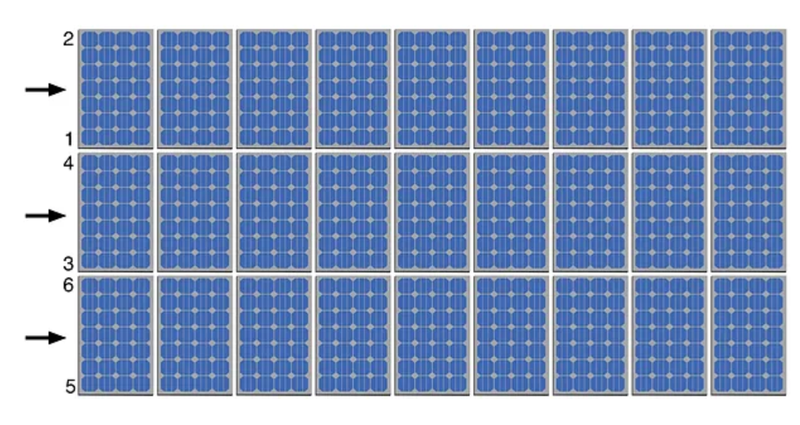
Top View
Now we'll look at this same principal from the top view. Top panels would be at the peak of slope. In some situations you might be working below the panels and that's fine too, but you'll still want to start in the same place. Once you get your pole setup correctly you should do the entire row. This tends to me more efficient, less fatiguing, and less wear on the pole adjustors. In this example you would scrub the one (bottom half of top panel) and then two (top half of top panel). Complete this entire row so you don't have to adjust your pole and then adjust your pole to do three and four. Once the entire row is done adjust your pole for five and six.

Trouble Shooting
Water Spots
If you finish a panel and notice water spots, there are likely one of two issues.
1. Your water filtration might be off, causing the panels to spot. To troubleshoot this you should test the water going into the filtration and the water going out of the filtration with a TDS meter. For glass it's best to have your PPM under 10 to be effective and not leave spots. If you find that your water isn't coming out below that, it's most likely your water that's leaving the spots. You'll need to replace filters or DI tanks to get your water lower, or find a better input source.
2. If your water PPM is below 10, then the water spots were most likely there. It's common for uneducated property owners to hose down panels, which you know leaves minerals on it from the unfiltered water. The biggest reason minerals become etched into glass quickly is from them baking in the sun. Unfortunately this happens incredibly quickly, especially when these are laying directly in the sun and they're flat so water sits on them. If this is the case then you'll need to educate the homeowner on the issue. You could consider a hard water stain remover depending on your company policy and practices.

Swirl Marks
Swirl marks are common when a a pattern isn't followed or if the panels are just severely etched. It's important to look back over your work to make sure it's drying properly. On a hot day, this could be seconds or up to an hour on a cold day. If you notice your panels looking like this remember the trick above, extending the pole so theres extra weight sitting on the panels. Do not apply pressure with force because that could break a panel if you push too hard or unevenly. Follow a steady pattern to be sure that every inch of the panels are scrubbed. Scrubbing should be steady and consistent across the entire panel. At the end be sure to get a good solid rinse to remove any muddy water still on the panels. Panels that aren't regularly maintained can be heavily etched for this first cleaning, usually a few redos will get them looking good, making your job much easier for next time. If you're continuing having issues you could consider applying a soap, however you'll need to make sure that's rinsed off completely with deionized water.
If you feel you have a full understanding of this module, proceed to the test. Once you complete the test, you will be redirected back to the main module page.