

Learn to Pressure Wash
Pressure washers are commonly used on outdoor furniture, vehicles, boats, decks, patios, cement, siding, fencing, heavy equipment, graffiti removal, and much more. They're incredibly efficient tools for removing natural debris build up, however improper use can cause serious damage or injury. In this module we'll go over the most basic operation of a typical unit and how to avoid property damage and injury.
Pressure Washing Vs Softwashing
-
Pressure washing has been a breakthrough in the exterior cleaning industry. Years later the term softwashing started making headlines as the latest and greatest. Softwashing focuses on using chemicals, primarily sodium hypochlorite (SH) in a controlled and strategic manner to clean exterior surfaces. SH is most commonly known as bleach and can be dangerous to humans, animals and plants if not used correctly. The SH is diluted in water and sprayed onto roofs, siding, sidewalks, etc. to remove mildew, bacteria, algae, and other organic stains. Softwashing is typically done with a low pressure diaphragm pump with the pressure around 40-80 PSI or that of a typical hose spigot pressure. This allows the solution to be applied without mist or splatter to the desired area. Today many companies use a combination of softwashing chemicals and a pressure washer to combine the two for the best results. This allows the softwashing solution to break down the biodegradable surface buildup and the pressure to push it away. Overuse of chemicals can have undesired consequences and an overuse of pressure/heat can result in property surface damage. In this module we'll go over proper use of chemicals, pressure, and heat for the safest and best results.
-
Safety
Before starting any task, we want to go over any safety concerns specific to the job. This starts with a job hazard analysis while inspecting the area. Remember you are responsible for yourself, coworkers, and others around you. You should also be concerned for animals and responsibly handle and chemicals. Consider the following before starting the job:
Do I have the proper PPE?
Personal protective equipment is important for all jobs when there is no other ability to control a hazard. Things like visible clothing, hard hats, gloves, slip resistant/waterproof shoes, safety cones, wet floor signs, etc. should all be considered.
Do I have a Safety Data Sheet available for working with these chemicals?
Try to work with products you're familiar and comfortable with. You should always have the SDS readily available. Accidents or unexpected reactions can happen at any time and the quicker you can handle it the better you can mitigate any given situation.
What part(s) of the machine will get hot once it starts?
Remember that pressure washers, heaters, pumps, batteries, and other equipment can get incredibly hot. Even after the equipment is powered down the equipment can stay extremely hot for an extended period. When using heated water or steam, all the plumbing and accessories past the heater will get extremely hot and can cause severe burns. On a typical pressure washing (no heating) unit the exhaust, engine and the pump get the warmest. When checking the oils and fluids make sure the unit is cooled down for safety and reading accuracy. The oil in the engine and pump will get hot. The exhaust on the unit is hot enough to start a fire so keep it away from buildings, dry brush and other fire hazards. Consider the unit moving from vibration as well and make sure it can't move to an unsafe area, causing a fire.
Are there any electrical concerns?
Electricity and water do not mix. This can be a deadly combination. Avoid electrical sources at all costs. Use the Lock Out Tag Out (LOTO) method to securely turn off and lock electrical sources. After LOTO, tape off the electrical source to avoid moisture getting inside. Consider plugs, lights, fans, power chords, solar chords, electrical equipment, and any other electrical concerns.
Are there any flooding concerns, especially in walkways?
When doing a project it's common for the water, chemicals, and debris to start pooling up in an area. This can be helpful if you're reclaiming the runoff but it can also create slipping hazards. Make sure you're properly notifying others around with signs, cones, and lights. Try to keep all hoses out of walkways and cross over sidewalks as minimal as possible. If there is puddling in a walkway or busy area consider stopping the job to find a solution. Things like floor squeegees or reclaiming systems can be incredibly helpful in keeping a safe work area and controlling runoff.
Taping off Plugs
After using the LOTO method, and you have confirmed the absence of a current with a voltage tester, you may need to tape off the source. This is common when working with water and an electrical source that cannot be avoided. Never attempt this on a LIVE circuit.- Tape the bottom part of the plate to the wall. Then tape vertically from left to right. Always start at the bottom and work your way up to create an overlapping pattern that will shed water.
- Continue your vertical taping until the plate is completely covered. When finished with the vertical taping, cover the top with horizontal tape to create a pattern to shed water.
- Finally, starting at the bottom first, run horizontal tape from the bottom to top to create a shedding pattern for water to run off.
After all these methods are in place, you should still try to avoid getting this area wet as much as reasonably possible. Before turning any power back on, the tape should be removed and the plug should be checked for moisture. When unsure, always leave the power off until it can properly dry or call an electrician. Turning on a wet electrical source could start a fire, cause a shock or even electrocution. -

-
Machine Options
There are plenty of different options when deciding which unit to use. There's no exact one size fits all and your decision might be the best choice for your scope of work. Things like needed water temperature/steam, location of use (indoor/outdoor), desired PSI, desired flow rate (GPM), and frequency of use all play a part in your decision. When using any machine make sure you're using proper hoses and accessories with the correct temperature rating, flow rate and PSI. Ignoring this could cause a mechanical failure, injury, or even a fatality.
Portable
Portable units are smaller gas or electric units that come on wheels. These tend to residential use up to commercial use and can be found with heaters. Portable units can be moved around the work area to get to areas that a non portable unit might not be able to. These usually come with the most basic accessories like a high pressured hose and wand. The portable units typically run anywhere from 2,000 PSI to 4,000 PSI. Smaller units come on two wheeled frames and larger units come on four wheeled frames. Even with a lower PSI and flow rate, using the wrong degree nozzle can result in serious injury or damage. These units are best used for homeowners, contractors with low work volume, or contractors working mainly on lighter surfaces. Most of these units can run from a typical hose spigot.
Mounted
Mounted units tend to be larger, commercial grade, and on the higher end of PSI typically 3,000 PSI to 5,000 PSI with a flow rate of 4-8 GPM. Because these units require more water, they usually need a buffer tank since they could end up pulling in more water than a typical spigot can handle. A buffer tank is a tank that is being filled up so the unit can pull directly from a filled tank. Since the user isn't on the trigger 100% of the time, the buffer tank has time to refill between trigger pulls. The benefit is obviously the power and the uptick in flow rate. Since these are mounted to a vehicle it usually means you'll need extra hoses to get to the desired area. With a good setup these can be a lot more efficient getting set up for a job and for cleaning up after a job. Larger mounted units are better for commercial projects, government projects, large work volume, and industrial facilities.
Gas
Gas machines are the most common types of machines are the market. They're consistent, affordable and offer good cleaning power regardless of needs. Keep in mind that most heaters use diesel fuel. Make sure you know which tank is which and which fuel is which. The drawback is they're loud, can't be run indoors, need more maintenance, and need fuel.
Electric
Electric units tend to be lower PSI on the homeowner end but they do have commercial units that can be up to 5000 PSI. These are not very popular for private contractors because they can draw significant amount of power, which would either require an electrical source or a generator. If you run a generator to produce that power, you could save a lot of money by just buying a gas powered unit. Because of this, these tend to be more common for personal homeowners or industrial facilities. The homeowner units are not efficient and can't handle large volumes of work. Commercial grade units work well in industrial facilities because they can be used indoors (no dangerous fumes), they're significantly quieter, they can turn of/off with a button, and they can be set up stationary with the correct power source to use in the facilities. These are common in food and beverage facilities.
Belt Driven
Belt driven units have a belt between the pump and the engine. Belt driven pumps are usually larger commercial grade machines. Having a belt between the pump and engine can reduce heat and vibration. The belt also makes it difficult to burn up the pump because the belt would break before the pressure could affect the pump. The belt will need to be replaced based on manufacturer's recommendation.
Direct Drive
Unlike a belt driven machine, a direct drive have a crankshaft that's inserted directly to the pump to turn it. These types of machines are usually lower commercial or residential grade. These machines are usually more affordable and compact. If the pressure was to back up inside the pump, there is a higher chance of burning up the pump.

-
Steam
Pressure washers that produce hot water or steam are the same as any unit. However, after the water is pressurized, it goes through a burner (usually diesel power) to heat up.The burner has coils in that are heated to the desired temperature. The entire burner will get extremely hot and stay hot for awhile after the unit has been turned off. When you're done with a job, turn the burner completely off and drain out the hot water to cools things down and avoid letting hot water or steam sit in your lines. Make sure you know what fuel types these take and don't mix it with the machine fuel. Remember when you heat up the water, all hosing, connectors, and accessories will become extremely hot. Hot water can increase the cleaning power while reducing work time, chemicals, and water needed. Some of these units can reach temperatures of over 300ºF (140°C).
Water turns to steam at 212°F (100°C) and using water at or above this temperature can create a buildup of steam in the surrounding area, especially when it's cold or if there is minimal exit for the steam to escape. This means limited visibility, significantly heated working area, and significant increase in humidity. Consider this when planning your job hazard analysis. Never run a pressure washer or heater in an area that isn't ventilated because of dangerous fumes.
-

-

-
Use a temperature gauge to monitor the temperature of your water. Before getting started on a job make sure all your hoses and accessories are rated for the temperature you're going to be using. Using unrated equipment can result in damage, serious injury, or death. You can also use these inline if needed to monitor the temperature coming out. Never heat water before it's pressurized.


Measurements
-
Pressure (PSI)
Pressure is measured in PSI which stands for pounds per square inch. PSI on pressure washers can range from 1500-4000+ PSI and everything in between. Even on the lower end of PSI, this could cause serious cuts or injuries if this PSI when working with a unit with high PSI were to make contact with someone's skin. While larger commercial machines are on the higher end of the spectrum for PSI, more PSI isn't always better. Machines over 3000 PSI can create damage and injuries much quicker and easier. If you're working with soft surfaces you might want a machine around the 2500 PSI range. When you're starting any project, always start your widest degree nozzle in an inconspicuous area and work your way up if needed. Starting with too much pressure and a narrow nozzle can result in immediate and permanent damage, even on hard surfaces like cement. The more pressure behind the machine the more difficult it is to control consistently. Consider ways to mitigate worker fatigue
Flow (GPM)
The flow of a unit is measured in gallons per minute, or GPM. The GPM can range anywhere from 1-8+GPM. The higher the GPM the more water you'll burn through. A high GPM can be a problem with poor runoff or limit water. If you have good runoff and unlimited water then the GPM may not become an issue for you. If you're running your machine from a holding tank with no water input, then you can divide the GPM rate by the take size to see how long it will last. For example if the tank is 500 gallons and the unit has a flow rate of 8 GPM then you'll have a work time of approximately one hour. 500gallons/8GPM = 62.5 minutes. Things like how full the tank is, if you're running multiple units, trigger time, accessories cause mechanical damage. type, and nozzle can all play a part in working time. If you're going to be refilling the tank as you use it then be mindful that the flow rate going in could be less than the flow rate going out. This is important because running your pumps dry could
Cleaning Units (CU)
The cleaning units of a machine is determined by multiplying the GPM by the PSI. The idea is to help consumers compare units to each other. Based on personal needs the CU may not be the best way to compare pressure washers. Getting the highest CU isn't always considered the best unit. Remember that flow is how much water you're using and PSI is the amount of pressure behind that water.
RPM
Revolutions per minute or RPM is the number of rotations that engine makes in a minute. Belt driven units run at significantly less RPM than direct drive. Since they're doing less work they end up staying much cooler and lasting longer. The larger the distance between RPM and PSI the better the machine. -
Breakdown
For this module we'll be focusing on the most common type of pressure washer. This is a gas powered direct drive portable cold pressure washer. During this module we're going to breakdown common features and what they do. Disclaimer: Not all pressure washers are exactly the same. If you're unsure, stop the job and refer to the owner's manual. Even the same brands can vary based on year, model, size, etc.
-
Air Filter
A key component of a combustible engine is clean air. If the air filter is dirty/clogged then the engine might be getting minimal air and the air it does get, is dirty. Remove the air filter cover to check the filter for dirt and debris. These can usually be cleaned with compressed air or they can be replaced. Check your air filter before each use to avoid pulling contaminants into your pressure washer.
Throttle
The throttle controls the amount of fuel and air injected into the engine which affects the engines power output, RPM. Starting and then work your way up. When the engine is cold it probably won't run on full throttle. As the engine warms you can adjust the throttle to run the unit smoothly. If the throttle is too low the machine will run choppy or end up dying. Turn the throttle all the way down when
Choke
The choke pinches the air off and provides the engine with a higher fuel mixture. If the engine is cold, the choke is necessary to start the unit. As the engine warms up you can slowly turn the choke off. Leaving the choke on can lead to engine damage and excessive fuel burning
Gas On/Off
When the unit won't be used for a few days it's a good idea to turn off the fuel so fuel isn't sitting in the lines. Over time gas goes bad so this disables bad fuel getting into the unit. If the unit fires up then dies, double check to make sure the fuel is turned to the on position.
Engine Oil Dipstick
The engine oil needs to be maintained separate from the pump. This should be checked regularly before each use when the machine is cold. Follow manufacture's recommendation when adding new oil. Make sure the oil looks clean and it's in between the min and max levels.
Engine Oil Drain Plug
The drain plug is used to remove the oil during an oil change. Make sure this plug is secured after draining before adding more oil. Properly dispose of any oil. -


-
Pump
The pump makes the machine. Let's look at the components of the pump and then we'll break it down into pieces to understand their function. Improper pump maintenance and use can lead to costly repairs.
-


-
Unloader
The unloader is an important part of the pump. The unloader releases water at a certain PSI into the lower pressure valve.
The unloader valve can be adjusted to different PSI settings to release at different times. An unloader valve is an important safety feature when it comes to avoiding overloading your equipment and burning out your pump. A properly adjusted unloader will keep the unit running at the manufactures recommended PSI. When the unloader is activated this is known as bypass mode.
-

-
Pressure Gauge
Pressure gauges are an accessory used to measure the PSI.
The gauge connects inline of the high pressure side of the unit. The pressure gauge gives you an accurate reading of the PSI, how steady it is, and what pressure it's releasing. It may not be necessary to have a pressure gauge installed all the time but it should be used when you need to adjust the unloader.
-

-
Thermal Relief Valve
The thermal valve is a valve that releases water at a certain temperature. When the unloader goes into bypass mode because of the PSI limit, the water is being pushed back into the low pressure side in a continuous circle back into the high pressure side. When the trigger is pulled again, the bypass mode is relieved and the water/pressure can escape through the wand or surface cleaner. If the trigger isn't pulled the water in bypass circulation begins to heat up. When it heats to the relief valve release temperature, the valve opens up allowing the water to escape. Once the thermal relief valve is activated, the valve needs to be replaced. Manufactures have a time limit on run time machine without pulling there trigger somewhere around two minutes. This is to avoid the relief valve from being activated. Try to keep your machine out of bypass mode by minimal idle time. This means turning off the unit when not using after a short period and releasing the pressure.
-

-
Chemical Injectors
Chemical injectors are used to put cleaning products onto different surfaces. These are commonly known as downstream injectors. The suction from the high pressure hose absorbs the chemical and mixes with the water. The drawback with this method of application is it can be difficult to gauge exactly how much product is being mixed and applied. There's a popular product known as an X-jet which allows the user to adjust how much product is being pulled. The alternative to applying product would be a sprayer with a mix in it or a softwash system that strategically mixes the correct application based on settings. These have become less popular with newer softwash technology but they can still be useful in some applications. In order for you to get a suction on on downstream injectors the nozzle tip needs to be a "soap" or application nozzle.
-


-
Pump Oil
The pump oil is used the lubricate the inner workings of the pump. Keep in mind the pump oil and engine oil are different. They should be checked, maintained, and changed separate according to the manufactures guidelines and directions. On most units, the pump and the engine are from different companies. Pumps have a dip stick similar to a vehicle oil dip stick. In addition to dipsticks some pumps also have a small window to see pump oil levels. Let's look at the process for checking your oil with a dipstick:- Locate the oil dipstick on the pump. If you can't find it then use the owner's manual. They all look slightly different.
- The unit should be turned off and cool. If it's not, the oil and dipstick will be hot and inaccurate. While wearing gloves, pull your dipstick out and wipe off all oil onto a rag. A clean dip stick will allow for an accurate reading.
- Now that the dipstick is clean, insert back into the pump until it's fully seated, then remove it quickly again. When removed put the dipstick level to avoid the oil running in any direction.
Pair text with an image to focus on your chosen product, collection, or blog post. Add details on availability, style, or even provide a review.
-
-
Reading the Dipstick
Now you'll have to read the dipstick. There are minimum and maximum readings on the stick which are sometimes holes, punches, lines, labels, etc. You want to keep your oil level in between these two lines. Your oil should look clear with a yellow/orange tint. If the oil comes out black or dark then the oil needs to be changed. If the engine is hot the oil oil will look thinner and spread out. Remember you want the pump cool for an accurate reading. If you're having a hard time getting a good read, repeat the process a few times by clean the stick, inserting it, then immediately pulling it out again.
-


Water & Plumbing
-
Hoses
You'll be working with a lot of hoses in this industry. Each connecter of the hose is referred to the female or male end. When you're rolling up a hose put the female end downhill, if you can so water drains out. If you can't then hold the rolling end slightly higher to let the water drain out. The male end has exposed threads so dragging the male end could destroy the hose end from use. The female end is protected so dragging it while rolling it up is fine. When rolling up the hose use the over and under technique. Basically you roll the hose over itself then under itself and repeat, to avoid any kinks. If you're getting a lot of kinks then straighten it out and start over. Putting a hose away with a kink in it will ruin it. Be sure to drain lines if it's freezing in your area.
When connecting your hose to the hose bib, make sure there is a sealing washer inside the female end of the hose connection. Sealing washers breakdown or split over time so this is most likely the reason for a leak between the hose bib and the hose. If the hose is leaking between the connector and the hose then it's most likely the tightening clamp. The tightening clamp needs to create a suction around the hose connection. If the hose splits or frays around this clamp it could cause a leak. First try to tighten the clamp in case it was loose. If it's still leaking then you can cut your hose down to move the clamp. If everything is in good working condition then a hose should be able to connect by hand tightening. If there's wear or leaks you can use channel locks or a wrench to tighten things up. On tightening clamps you can also usually use a phillips or flathead screw driver -

-
If your hose is split or damaged near the connections you might need to cut it and move the connectors down. To do this you'll want to loosen the tightening clamps only enough to slide them down the hose. After this you can cut the hose down to the desired length to remove any imperfections or leaks. You'll then need to cut the remaining hose off of the connection barbs. The barbs need to have the remaining hose cut off of them. Now slide your connection back into the freshly cut hose and move the tightening clamp over the barbs. If the barbs aren't going in easy first make sure you have the right size. If they're loose then then won't work. They should be tight enough not to pull out but still take pressure to get them in. You can also use soap to help lube the barbs and slide them in. On hoses that are harder or plastic sometimes boiling the hose end will help you get the barbs in by softening the hose. Remember that your hose will be hot. Once the barbs are fully in, tighten your clamp to create a seal around the barbs and test the hose for leaks.
-


-
Anti-Theft Hose Bibs
These hose bibs are common on commercial buildings or area with high foot traffic. They make it more difficult for anyone to turn on and use water that they're not suppose to. Using an ani-theft hose bib key you can turn the water on and off. You can also use tools like channel locks and wrenches but make sure you're not charring up the valve on the bib.
-

-
Hose Reels
You'll likely come into contact with hose reels on this job. This can be for garden hoses, waterfed hoses, or high pressure hoses.
Unreeling
When trying to reach a project you should always start with the hose completely out as far as it will reach and work back to starting. This will help you avoid yanking the hose or getting it caught on anything. Pull the entire length to the closest corner, second corner, and so forth.
Reeling Up
When you're reeling the hose back up, get the entire hose untangled and laid out in the immediate area. Grab the hose with a towel in one hand while rolling with the other. The towel will not only protect your hand but also clean the hose as you roll it up.Pair text with an image to focus on your chosen product, collection, or blog post. Add details on availability, style, or even provide a review.
-

-
O Rings vs. Sealing Washers
Almost every piece of equipment or hose has an O-ring in it.
Over time the o-rings go bad or deteriorate and need to be replaced. If you're getting heavy leaking at a connection try tightening the connection. If that doesn't work then check your o-ring. An o-ring is a piece of rubber or plastic that pinches in between the two connectors to get a suction.
-


-
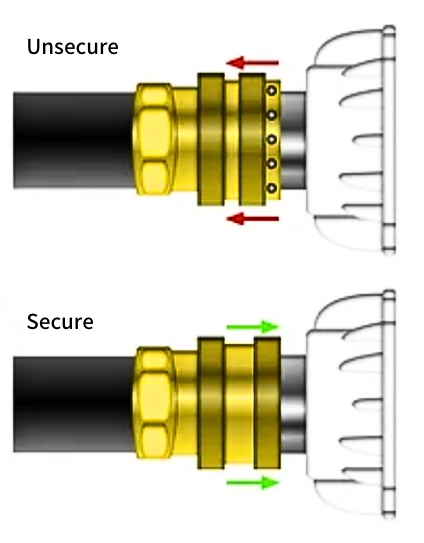
Quick Connects
If there are no threads on a hose connection, it's probably a quick connect. You should be able to slide the male and female end together and hear a click. To release simply pull back on the female end and the male end will release. These connections also have o-rings that could need replacement if they're leaking. If the connect or hose is leaking, never try to cover with anything, especially a body part. The pressure behind these could cause serious injury. If you're struggling to separate a quick connect, it's most likely because of pressure in the lines. Power down the unit and release any pressure before working on your lines.
-

-
M22
M22 are threaded connections for pressure washers. The M stands for metric and 22 is the size. These are less common in commercial applications. If your equipment has M22 connections then you can purchase quick connect adaptors for easy use and efficiency. M22 connections have O rings inside the female end to create a seal and need to be replaced over time just like quick connects, usually more option. Make sure you're using the proper size O ring with the right temperature rating.
-
Tank
Tanks are commonly used in the pressure washing industry to transport water and chemicals. The weight of liquids on a vehicle or trailer significantly increase or decrease the weight of the load depending on whether it's empty or full. Be aware of this when carry liquids in a tank and reset your break controller. Tanks are best to carry full or empty when possible to avoid sloshing on the road. Water stored in tanks, especially stagnant tanks tend to develop algae. This is the work of photosynthesis, since algae needs light to grow. Depending on where you live, this could be an issue in warmer times of the year but hopefully you'll also be busier so the water won't be stagnant. If you're experiencing algae growth consider the following.
- Use an opaque water tank so light cannot penetrate and encourage algae to grow.
- Add a supplier recommended amount of bleach to tank based on how much water.
- Add a supplier recommended amount of chlorine to the tank based on amount of water.
When you're working out of a tank, you also need to be aware of the flow rate going out. Most pumps are not designed to run dry and you could end up burning up your equipment if you are not paying attention. Some contractors can run a continuous flow of water back into the tank so it won't run out. These tanks are known as buffer tanksinstead of supply tanks, becuase they create a buffer between inflow and outflow. To control the inflow of water into the buffer tank you will need a Hudson float valve. This type of valve is designed to shut off once the water reaches a certain level but lifting a shutoff valve that floats in the rising water.
-
Freezing
Frozen lines can cause issues for equipment and hoses. If lines are frozen then your pumps might not be getting the water they need into the lines. The best way to prevent frozen lines (aside from storing things inside) is to drain the lines. Once they're filled with ice it can be a long wait time for things to melt, if it's even warm enough outside. During nights with expected freezing temperatures empty all your lines completely. Be sure to open both ends of lines to create a suction to pull water completely through. For pull start pressure washers, you can lightly pull the pull start to release any excess water sitting in the pump. If your lines are frozen, try the following:
1. Pull apart all the lines at any connection.
2. Wiggle the hose from end to end to break up the ice.
3. Connect one end of the line to running water to try to flush out the ice.
4. Continue to maneuver the line until water is flowing through.
If you start your pressure washer in the cold and no water is coming out turn it off immediately and check the lines for water

-
Cam Locks
Cam locks are hose connections often found on commercial properties or industrial facilities. They're designed for high pressure so consider this if you're hooking it to some of your equipment. To open the cam locks release the side levers by pulling the pins and separate the connections. To connect the hoses back together insert the male end into the female end with the levers in the open position. To lock the connections push the levers down. If the levers aren't securing then the connections might not be properly seated. Release them and try again until the levers completely lock down.
-


Accessories
-
Gun/Wands
The wand is the most common connection accessory to the pressure washer. The gun is broken down into the trigger and the lance. The trigger is located on the handle which release the pressurized water when pulled. Always point the tip in a safe direction with excessive distance from any surface or object before pulling the trigger. The lance is the portion of wand between the trigger and the tip. Lances can range anywhere from three to six feet. Manufactures have also developed extensions known as telescoping wands which allow the wand up to three stories. While this can be helpful on jobs, it can be difficult to control the device consistently because of the pressure and being top heavy. If possible, it's better to use an elevation lift to safely reach and clean the area for safety and quality of work.
-


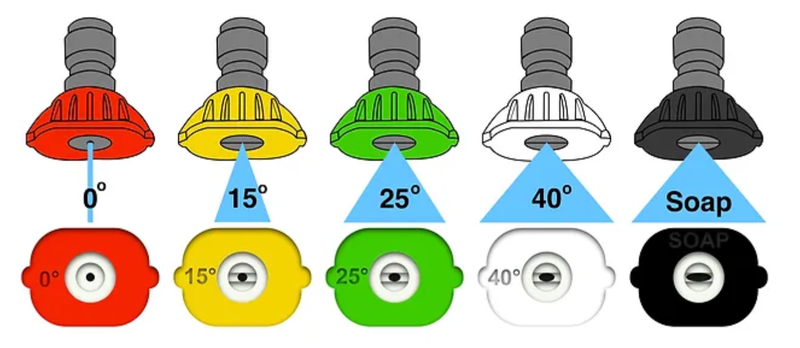
Nozzles
The lance has a female quick connect on it to connect to nozzle tips. The nozzles change the degree of the pressurized water to create more or less pressure. The lesser the degree, the more aggressive the force or pressure will be. When you're starting a job, always start with a wider nozzle and work you way down. Make sure the nozzle is completely seated, and the quick connect it fully locked. If the nozzle isn't secured and the trigger is pulled, the nozzle will eject under serious pressure which could cause serious damage or injury/fatality. After the nozzle has been switched, point the want in a safe direction and pull the trigger if you're sure it's secured. Never point the wand over a body part or in the direction of someone else. If any part of the unit is leaking, power down the machine and release any pressure before working on it. Working on a unit under pressure could cause severe injuries or even death. If you're having trouble release any quick connects, it's most like because there is still pressure in the lines. Be sure to release the pressure to release quick connects. Let's look at some nozzle options.

Clogged Nozzle
Most pressure washers have small sealing washer sediment filter screen that catches small debris that get into lines. Before hooking up inlet water double check that the sealing washer with a sediment filter is in good working condition. Unfortunately sometimes things still get through which can clogged nozzle tips. If this happens do not touch the clogged nozzle and do the following.
- Power down the machine.
- Release pressure in the line.
- Remove the clogged nozzle.
- Remove the debris by pushing it back towards the connection.
- Once debris is removed, put the tip back on wand and secure it.
- Pull the trigger under and inspect proper water flow out the tip.
- If the flow looks good, turn the machine back on to proceed with caution.
Changing Nozzle
Your nozzle needs to be completely seated and secured before pulling the trigger. If the trigger is pulled while the female quick connect is compressed at all, the nozzle will fly off under serious pressure. Due to the small size the trajectory could cause serious damage to property or injury to an individual. When you're replacing the nozzle do the following.
- Point the wand in a safe direction.
- Remove the current nozzle and place in proper holding area.
- Pull back the female quick connect place the desired nozzle in, then release.
- Pull the seat and secured nozzle to ensure it's full locked in.
- Pointed in a safe direction, pull the trigger to check for proper installment and operation.
Replacing O Ring
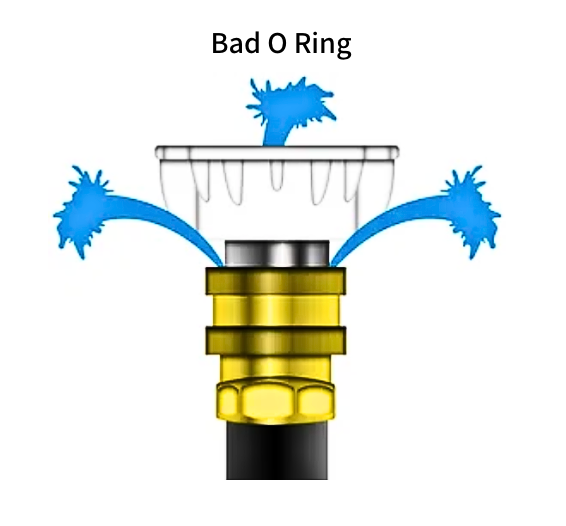
The O rings in pressure washer wand nozzle connections are commonly 3/8" while the male quick connect on the hose are commonly 1/4". This can vary from different manufactures but the point is to make sure you have the correct size O ring for the job. An improper O ring could result in an unseated nozzle or wand/surface cleaner/accessory. Adjusting quick connects with water running (low pressure, never attempt with high pressure) can cause the O ring to adjust out of place. If your O ring needs to be replaced then completely turn off any water flow to ensure the ring goes completely in.
O rings are rated to certain temperatures and range in sizes as well. This graphic shows the result of a damaged, missing, or improper installation of an O ring.
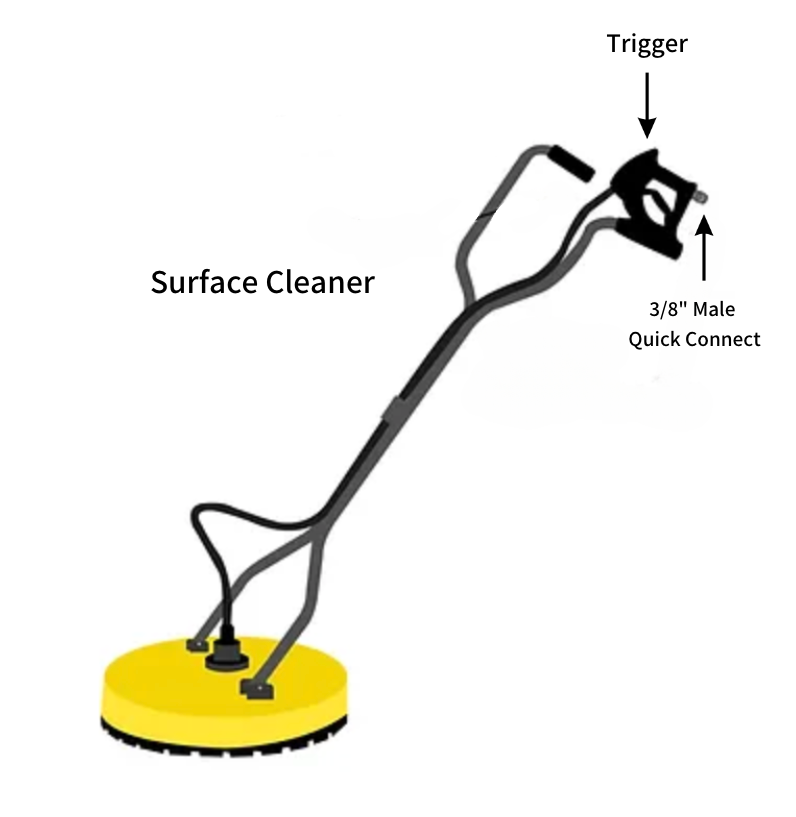
Surface Cleaner
Surface cleaners are accessories that connect to the end of the high pressure hose to replace the wand. Surface cleaners have two (sometimes more) nozzles that are on a tilt to create a circular spinning motion. The spinning nozzles allow you to clean flat surfaces much more efficiently and consistently. When you're using a surface cleaner you want to work slowly but with continuous movement. If you're moving too quick the surface will have circular lines in it. Going too slow could etch the surface. It's better to move quicker at first then slow it down to get a good consistent rhythm. Surface cleaners are designed to work with certain units depending on capabilities.
-
Slow, Steady, & Overlapping
When you're working slowly, steady and overlapping your passes, you should see something like this. Naturally with the surface cleaner shape, you'll miss corners and areas which you can go back and get with the wand after. Surface cleaners won't usually leave the area cleaner unless there's exceptional runoff or you have it connected to a vacuum system. Surface cleaners are great for breaking down debris on flat services but you'll need to wand the debris off after.
-

-
Inconsistent Patterns
If you're moving too quickly, then you might see circular patterns like this. Always continue to move your surface cleaner while it's spinning but you might need to slow down for a more consistent clean. Judge your speed based on the quality of outcome.
-

-
Surface Etching
Surface etching is a common type of damage from a surface cleaner. The surface cleaning is actually eating away at the surfacing causing irreversible damage. Lets look at some reasons this could happen.
Too Much PSI
If the PSI is too aggressive or overrated for the machine, then the force may etch into the surface and cause it to rotate at an overly aggressive speed. This can also happen with a high GPM because the extra water force is raising the PSI.
Too Little PSI
If the PSI is too low the spinner might not be able to rotate. With the pressure not rotating, the surface could become etched as the user moves the cleaner around. This could also happen if the spinner is stuck. Make sure your surface cleaner is rotating
Nozzle Issue
If the nozzles are clogged up then the pressure could be much more direct and higher than designed. This extra pressure can etch the concrete. Over time the heads need to be replaced or adjusted with a different unit. Make sure you're working with a nozzle with the proper PSI and GPM for that machine. -

-
Splitting Sidewalks
On most jobs you might have the end the project at a seam. Keep the surface cleaner right at the seam and don't cross over. Naturally you'll miss the edges. Come back later with the wand to touch up any missed areas the surface cleaner couldn't reach. Even with extensive experience, the concrete will need to be touched up with a wand and rinsed. To limit switching tools back and forth, you should start with a surface cleaner and finish with a wand.splitting-sidewalks
-

-
Corners
If you're going over the corner of concrete, do not let the surface cleaner drop down. If the swivel hits the corner, this will likely chip the corner of the concrete. Either keep the surface cleaner hovering above the corner or avoid it and come back with the wand.
-
Pressure, Detergents, Heat
Each of these provide great value in the cleaning industry but they also create their own hazards and liability. Too much of any can have serious consequences but not enough can deter you from getting the results you want. Using these three in conjunction to each other add an immense amount of efficiency and quality of work to pressure washing but should be used with caution to manufacture and SDS recommendations.
Pressure
Selecting your nozzle is an important step to practicing pressure washing. Almost all materials will receive damage if the pressure is too high. Pressure washers are not made to strips things and even you decide to there is no way you'll be able to do this without causing damage. Always use the lightest possible pressure and nozzle to get the job done safety, efficiently and without damage. Start with a low pressure and farther away from the material and slowly work you way up. Concrete, wood, siding, etc. will be permanently damaged from too much pressure.
Detergent
Detergents, chemicals and soaps are amazing compliments to pressure washers. By applying these strategically with proper dwell time prior to pressure washing will allow you to get the job done much more efficiently and with less pressure. It's important to understand what you are using, how it should be used, and the material data sheet should be read prior to application and have easy access on the job. This can also create a much deeper clean that lasts a lot longer.
Heat
Heat is another great resource to pressure washing. Keep in mind that this will cause all of your equipment to heat up as well. It could also cause a lot of steam buildup in the area making it difficult to see. Heat can offer a much quicker clean with less pressure. It works really well on organic buildup as well as paint. When adjust your head levels be sure you are wearing heat resistant gloves and start at a lower temp and work your way up as needed to save fuel and for safety. -
Getting Started
Before getting started on the job we want to have a safety focus. Walk the job and look for electrical, fire, flooding, tripping, slipping, chemical, falls, etc. hazards. Before starting work solve each and every hazard without compromise. Not taking the proper time to do this could lead to serious consequences to include injury, property damage, or even death.
Prepare the Work Area
Once you have address the safety concerns, take a look at the customer's belonging. Are there items that are breakable or need to be moved? Can you take pictures of decorations or furniture so you can put them back in the same formation? Is anything broken already that you could be held liable for? If so get your manager or the owner involved prior to beginning work. Clear the immediate work area of any obstacles, debris, or tripping hazards. Ensure good ventilation and adequate space around the pressure washer for safe operation. Remember all pressure washers (unless electric) need to be operated outside and away from flammable hazards. They will also vibrate and move (unless truck/trailer mounted) so keep this in mind when considering a safe space away from fire fuel. You should always have the operating manual present and make sure you understand specific instruction and safety guidelines for your particular model.
Checks
- Engine Oil
- Pump Oil
- Engine Fuel
- Heater Fuel
- Air Filter
- Hoses and O-Ring damage
- Attachments and equipment for damage
- Set the Choke: If your pressure washer has a choke, set it to the appropriate position based on the temperature and engine requirements. Refer to the manual for specific instructions.
- Fuel Valve: Turn the fuel valve to the "ON" position.
- Ignition Switch: Turn the ignition switch or key to the "ON" position.
- Pull Cord/Electric Start: If your pressure washer has a pull cord, grip it firmly and pull in a smooth, swift motion to start the engine. If it has an electric start, simply press the start button. If the cord won't pull, try releasing any pressure in high pressure hose.
- Warm-Up: Allow the engine to warm up for a short period, following the manufacturer's recommended warm-up time.
Attachments and Accessories
Depending on the cleaning task, select and attach the appropriate nozzle/wand or surface cleaner. Make sure the quick attachments have proper O-rings and are completed seated. Unseated connections can shoot off with extreme pressure causing property damage, serious injury or even death. Follow the manufacturer's instructions for proper attachment and alignment.Water Source
Connect a garden hose to a water supply that can provide a sufficient flow rate and pressure for the pressure washer. Ensure the water supply is turned on and the hose is free from kinks or blockages. If your source is from a tank you may need to create water flow prior to connecting to the pressure washer. Do this by opening the valve and connecting the hose while the water is flowing out.
Start-Up Procedure
Follow these general steps to start the pressure washer:
Testing the Spray
After the pressure washer is running smoothly, test the spray by squeezing the trigger on the spray gun. Ensure that water is flowing properly and that the spray pattern is as desired. If your pressure washer allows for pressure adjustment, use the appropriate controls to increase or decrease the pressure based on the cleaning task and surface being cleaned.
Shutting Down
When you are finished using the pressure washer, follow these steps to shut it down safely: Engine Shutdown: Turn off the engine using the appropriate controls or switch. Release Trigger: Release the trigger on the accessory in a safe direction to relieve pressure. Water Supply: Turn off the water supply at the source. Disconnect Accessories: Detach any attachments or accessories from the pressure washer. If you cannot detach accessories or hoses there is likely still high pressure inside the hose. Proper Storage: Follow the manufacturer's instructions for proper storage of the pressure washer, including fuel stabilization, protecting it from extreme temperatures, and securing it against unauthorized access. Always refer to the specific instructions provided by the manufacturer of your pressure washer for detailed and accurate guidance on starting, operating, and shutting down the equipment. -
If you feel you have a full understanding of this module, proceed to the test. Once you complete the test, you will be redirected back to the main module page.


