

Understanding work Vehicles
Setting up the work truck for the day is something that can be easily over looked. Forgetting a ladder while setting your truck up can leave you on a job site without the ability to get a job done efficiently and sometimes even safely. If you don't understand something on your schedule then immediately bring it up with a supervisor for correction. Always make sure vehicles are stocked with tools and supplies. Treat the company vehicle with respect and don't lean tools and equipment against it. The vehicle provides you an income and should be treated with care so it can last.
-
Crash Physics
Car crash consequences can vary greatly depending on vehicle speed, how abruptly the vehicle stops, if victims wore seatbelts, if air bags were effective, the type of vehicle, and what the vehicle made impact with. Take note that we can make an impact on most of the consequence factors. For years engineers diligently work to make vehicles safer for us by trying to reduce the g forces acted against crash victims. Impact forces are calculated as follows:
F= m * V² / (2 * d)
F = Average Impact of Force
m = Mass of an object
V = Initial speed of an object
d = Distance traveled during collision.
Vehicles are designed to collapse on impact because the shorter the distanced traveled in a collision, the more force acted onto the passenger(s). The vehicle collapsing allows the vehicle to slow the impact and take on more force. The force impacted onto the driver is a correlation of speed, distance travel in collision and the mass of an object. The only input we can control is our speed, which in return affects the other two inputs, which affects the force outcome. Speeding takes off seconds, maybe minutes into our commute but can increase the consequences of a crash significantly. While we can't 100% avoid accidents, but by slowing down to the speed limit we can lower the consequences of our crash significantly by allowing us time to make decisions and react to our surroundings. Do what you can by wearing your seatbelt, being a defensive driver, and driving the speed limit. Don't put yourself and others at risk. -
Safety
We spend a good portion of our day driving. Whether it's coming/going to work, driving between jobs, or anything in between, it's a part of our day. With the busy lives we live, driving can feel like a mundane task. We've got phone calls to make, texts/emails to send, social media posts to make, dozen of apps to scroll through, eat our food, and many other tasks during our day. When we get comfortable driving, sometimes it feels convenient to get another task done. When we get comfortable or complacent, we end up making a mistake. A mistake in a vehicle can be deadly. When you're driving, that should be your only task. This starts with planning. Consider the following topics when it comes to vehicle safety.- Plan a safe ride home before going out. This could be a ride sharing service, a designated driver, public transportation or a safe place to
- If someone else has been using then take their keys and get them a safe ride home.
- Be a defensive driver. Be alert, especially after large drinking events, on weekend nights/early morning, and in downtown areas.
- Use in moderation to stay in control of your body and decisions.
- Be aware of any type of side affects to anything you put in your body.
- Remember you don't ever drive better under the influence.
Before You Drive:
-Plan where you're going and which route.
-Setup GPS if needed.
-Make phone calls, send emails and texts before leaving.
-Take a break to eat your food.
-Use the restroom and hydrate.
-Tie down equipment and secure vehicle.
-Communicate if you'll be late beforehand to reduce stress.
-Don't drive if you're on medication or don't feel well.
-Do not drive if you're tired or feeling drowsy.
-Make sure windows and mirrors are clean for visibility.
-Check that all lights are functioning properly.
While Driving:
-Always wear your seatbelt.
-Don't take phones calls unless hands free, necessary and legal.
-Do not check your phone for any reason other than emergencies.
-Pull over before starting another task.
-Don't be an aggressive driver.
-If you have a passenger use them as a resource.
-Be a defensive driver by planning ahead and slowing down when conditions warrant.
-Be constantly scanning for animals, people, debris, and other hazards.
Poor Weather
-Consider the safest route (always)
-Drive at a speed appropriate for weather conditions.
-Never cross a flooded area
-Try to avoid driving in inclement weather unless necessary (no matter what Eddie Stuart says!)
Road Rage
-Do not get involved in road rage.
-Do not tailgate or flash your lights to pass.
-Be a courteous driver, allow others to merge.
-Do not make eye contact with angry drivers.
-Only use your horn for attention, not aggression.
-If you feel threatened, or unsafe, get to a safe public area.
Gassing Up
When gassing up be aware of your surroundings. Do not use cell phones or radios during the process in case of sparks. Sparks could cause an explosion. Try to pull into a gas station in a way where you won't have to back out.
Speeding
-Do not speed.
-Speeding makes losing control of the vehicle easier, and it reduces the effectiveness of safety features.
-Increased severity risk in crashes.
-Speeding increases stopping distance which can be problematic in the event of an emergency.
-Unnecessary fuel consumption and cost.
Accidents
If there's an accident, get yourself and others to safety. Call first responders if help is needed. Do not stay in the roadway or put yourself in danger in any way. After all parties are safe, immediately contact a supervisor. Fill out a vehicle accident form, get insurance information, witness information, other driver information and a statement from each party.
Driving Tired
Drowsy driving can have serious consequences. Driving tired can lead to impaired cognition, slow reaction, and throw off your natural circadian rhythm. Accidents that occur from a driver falling asleep can be incredibly dangerous because there is no effort or reaction to stop the accident. This usually occurs with solo drivers because there's no passenger to wake them up. The obvious answer is to get more sleep. Unfortunately there are other things in life that might make it difficult to get sleep, like busy work schedule, night work, stress, babies, insomnia and other reasons. You're the only one who knows your body and when you're pushing it too hard. Remember that driving tired isn't just putting you at risk but others in your car or on the road. Be aware of any feelings of drowsiness or swerving motions. This can include hitting the bump strips on the side of highways. When this happens you should immediately pull over in a safe place and get some rest. Try to avoid excessive caffeine drinks if you're genuinely tired. This could cause a crash after resulting in you becoming more tired. Do the right thing and get off the road.
Driving Under The Influence
Driving under the influence of any drug or alcohol is a horrible idea. Driving under the influence can be from alcohol, prescribed drugs, over the counter drugs, recreational drugs, or illegal drugs. This puts you and others in immense danger. Often times users will make comments about driving better or being more focused under the influence. While they may feel incredibly focused on one aspect of driving, they might be completely ignoring other important safety practices. On top of being unware of what they're missing, they're acknowledgement and reaction time of a situation could be incredibly delayed or non-existent. Most drugs will make you feel either relaxed or adrenaline. Either of these states are dangerous. As a defensive driver you should be present and alert at all. Many states will measure alcohol tolerance by your Blood Alcohol Content (BAC). Driving with any drug or alcohol in your system should not be tolerated at any level, especially at work. There is nothing good that will ever come from a decision to drive under the influence at any level. If you're going to being using drugs or alcohol then plan ahead so you're not making decisions under the influence. Consider the following:
Tying Down Equipment Before leaving any project be sure to tie down and secure all equipment. Make sure each tie down in is good work condition without frays and working properly as designed. Small equipment could be incredibly dangerous when traveling at a fast pace. Before driving away, do a walk around and double check the vehicle for any equipment that could potentially be dangerous on the road.
Road Signs
Road signs are there to make drivers aware of something unexpected or unusual on the roadway. We see these signs everyday and can get complacent on familiar roadways. Below we'll look at some common road signs we see and some notes to be aware of. Keep in mind these vary greatly from state to state and can be completely different outside the United States.
-

No Left Turn
No turning signs are used to warn drivers of dangers when going that direction. This is could be oncoming traffic or crossing traffic. -

No Right Turn
No turning signs are used to warn drivers of dangers when going that direction. This is could be oncoming traffic or crossing traffic. -

No U-Turn
These signs are positioned at left turns. While some intersections allow u-turns, some are too unsafe to make the maneuver. Try to pull into an empty parking lot if you need to turn around and avoid u-turns when possible. -

Do Not Enter
Do not enter signs are commonly used for off ramps, exits, or one way roads. Whenever turning down a new road look for these signs to avoid a head on collision. -

Must Turn Left
These are directional signs used to keep drivers in the correct driving lane. Not turning the correct way can cause a dangerous accidental merge into traffic -

Speed Limit
Roads are engineered to handle certain speeds of average cards and trucks. Driving too slow or fast could cause loss of control of the vehicle. Go the speed limit. -

Wrong Way
These signs are positioned on off ramps or one way roads. If you're turn down a road you're unfamiliar with look for one of these signs to avoid a head on collision. -

Direction Options
Try to maneuver lanes and signal ahead by looking at directional options either one a sign or on the roadway. This gives other drivers time to react and for you to get into position safely. -

Keep Right
Driving slow in front others can cause road rage and a bad reputation for your company. Use the passing lane when it's safe to do so then return to the other lane once you've passed the vehicle. -

Yield
Yield signs are usually used for a traffic merge or potential cross traffic. Slow down, look each direction and proceed with caution. Don't assume another driver's actions -

Stop
Make a complete stop at every stop sign. Never assume other drivers will stop and only proceed once it is safe to do so. -

Lights Ahead
Be advised that there is a stoplight ahead. Never try to race a light and be ready to slow down. Most yellow lights are set 3-6 seconds long. Always stop if it's safe to do so. -

Four Way Stop
This sign is used to inform drivers that there is cross traffic ahead. Even if you have the right away, slow down and proceed with caution. Don't expect other vehicles to stop. -

Divided Highway
These signs are common when a highway is expanding. Be ready to merge and watch out for the center divider. -

No Passing Zone
Don't pass in no passing zones even if it seems safe. If someone is trying to pass, don't be an aggressor, and stay out of their way. -

Crosswalk
Hitting a pedestrian could be a catastrophic mistake. If you see a cross walk sign then slow down and yield to any pedestrians. Most people assume you can see them and proceed without warning, so always be on the lookout. -

School Crossing
Like the crosswalk sign above, these are common in school zones. Children are unpredictable and drivers should be hyper aware in these zones. -

Railroad Crossing
Many railroad crossing don't require vehicles to stop, however you should make it a habit. Making a quick stop and looking both ways before proceeding could save your life. -

Flagman
Slow down and be ready to take direction from a worker. -

Construction Zone
Look out for workers, equipment, cones, supplies, damaged roadways and other hazards that could be in the roadway. Slowing down and being aware can help make better decision if there were a hazard on the roadway. -

Cones
Respect cones. These are placed specifically for public safety and shouldn't be moved or trespassed.


-
Common Dashboard icons
Dashboard icons are there to warn drivers of needed maintenance, safety concerns, or mechanical issues. Be aware of these and deal with them immediately. Here are some of the most common ones but not limited to. If a light comes on and you're unaware of the meaning then get to a safe area to pull over and read through the owner's manual. Dealing with these lights timely will save time, money and keep you and others safe.
-

-
Tires
Tire Labels
The side of tires have information for you to use. This information can be valuable when buying new tires, changing a flat tire to confirm compatibility, checking tread, checking PSI and more.Pair text with an image to focus on your chosen product, collection, or blog post. Add details on availability, style, or even provide a review.
-

DOT
Department of Transportation (DOT) is a label to certify the tires for sale with a manufacture code and date of manufacturing. The DOT regulates all of the United States transportation industry.
Tire Type
Tire types are rated P for passenger, LT for light truck, and ST for special trailer. Different tires can carry different loads and have different PSI ratings.
Tread Width
Tire width is the measurement of tire tread that makes contact with the road.
Aspect Ratio
The aspect ratio is expressed as a percentage by dividing height by width. In this example the side wall is 75%, meaning the sidewall (distance from rim to tread) is 75% as high as the tire is wide.
Radial Diameter
This measure is the internal radial of the tire, which will give you the side of rim it will fit. In this example the tire will fit a 14 inch rim.
Load Rating
This is the amount of weight the tire can handle. The load rating reflects a number in pounds based off of load rating index chart. Then multiply this number by four (or however many tires you have) to get your load rating capacity. In this example the load rating is 82. In a load rating index chart this equivalents 1047lbs. per tire. So the over weight on these tires should be under 4, 188lbs. (1047lbs. X 4 tires).
Speed Rating
This is the rating speed at which a tire is designed, engineered and manufactured to operate properly. Running the tire at higher speeds could have dangerous consequences.
MAX PSI
The psi is the amount of air pressure the tire is designed to have. Do not exceed this number.


Pound-Force Per Square Inch (PSI)
PSI is there to notify the user of the maximum air pressure recommended for the tire. A lot of new vehicles have built in PSI gauges know as tire pressure monitoring systems (TPMS) however you can check with a PSI gauge by place it on the air valve. Keep the PSI below the maximum PSI because the air can expand and contract in different temperatures. Heat will increase the PSI while cold will decrease it. It's not uncommon for a PSI gauge to alert drivers of low PSI in the winter and max PSI in the summer.
Be aware of this during extreme temperatures and times of the year while managing your PSI. Regular improper PSI can also cause your tires to wear unevenly which means higher maintenance costs and safety concerns. Before checking PSI be sure the tires have cooled down for an accurate reading

Wear Relation to PSI
Tire tread can be affected by continued improper inflation or deflation. If you see this type of wear on your tires be aware that that it could be a PSI issue. If you're PSI is regularly on the low end on one tire or that tire is always low, you might have a small leak and need to get it fixed.
Other types of improper wear can come from unbalanced tires, alignment being off, or bent/worn suspension. If you notice anything other than consistent tread wear, you might need to have it look at by a tire professional.
Checking Tread
Tire tread wears over time which can be incredibly dangerous, especially in rain and poor driving conditions.
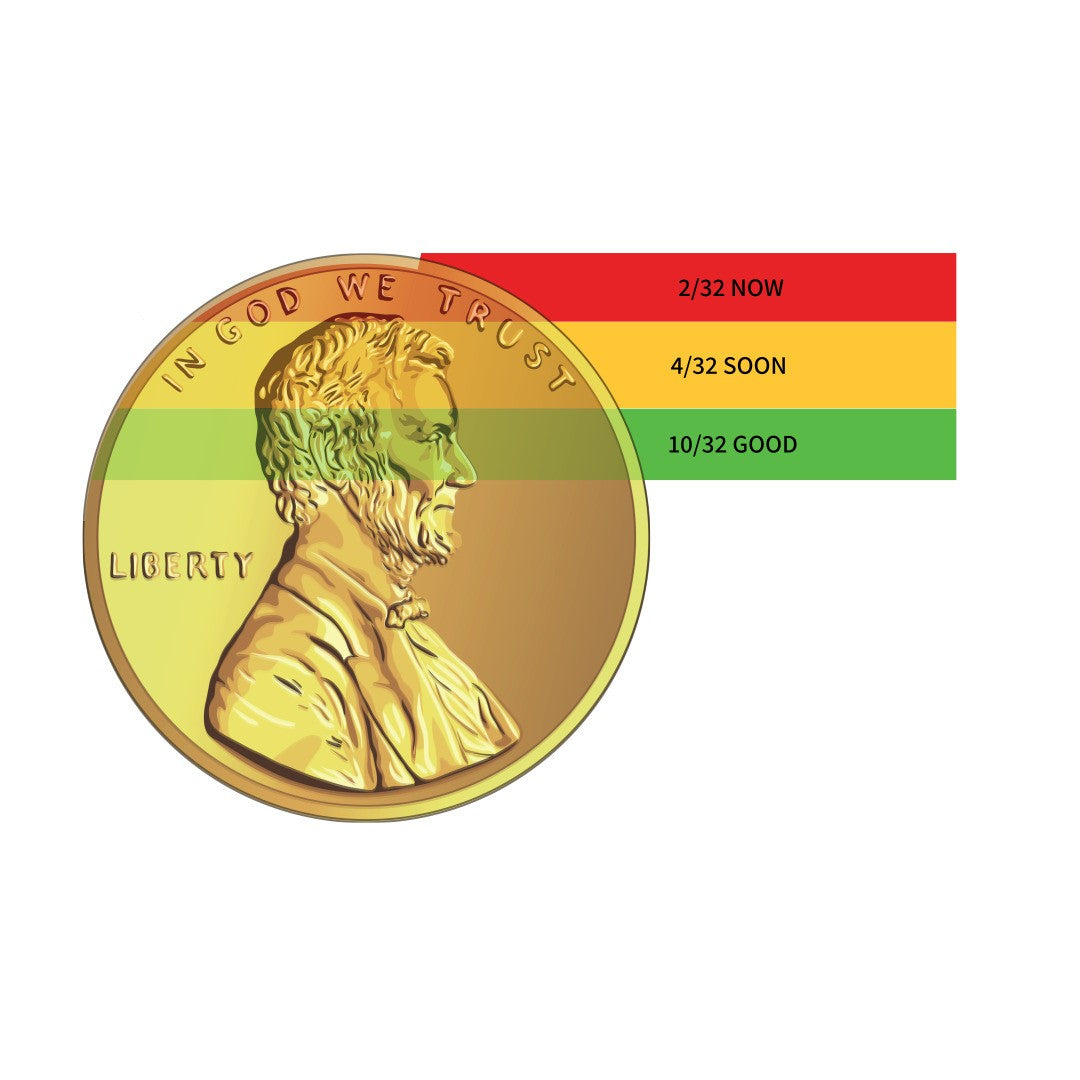
Bad tread could result in the vehicle slipping or losing traction. During a vehicle inspection the tread should be check for wear. First visually inspect the tread for uneven wear. Uneven wear could be from improper PSI or the vehicle alignment being off. To get a good idea of the tread wear you can use a penny. See the example below for a proper reading.

Tread Wear
Unless the tires are brand new there will likely be some wear. You've looking for even wear and above 2/32" for wear. If you're within the soon mark, and you've got winter coming up, it might be time to get new ones before there's an accident. Tires also have something called a wear bar. The wear bar or tread wear indicator are small pieces of rubber that run perpendicular and below the tread.
When the rubber gets down to the wear bar, the tires have reached their legal limit for safe operation and should be replaced immediately.
-
Rotating tires
Rotating the tires is a process used to even out the wear on the tires. Tires should be rotated 3,000-6,000 miles of wear, or every time the oil is changed. When tires are not rotated they can wear unevenly which can throw off kilter the maintenance schedule by not replacing all tires at once. See how tires should be rotate, and keep to the same pattern for continued even wearing. -

Changing Tires
In order to rotate your tires you need to know the process for how to properly remove and replace your wheels. This can be helpful for rotating tires as well as dealing with a flat tire on the road.- Make sure yourself and others are in a safe place. You need to be away from traffic on a flat surface with your hazards on. If this isn't possible then get to a safe location and get the vehicle towed.
- Block the tires to prevent the vehicle from moving once the jack is being used.
- Find the spare tire, jack, and tire iron with the assistance of the owner's manual. Sometimes these can be difficult to release with proper manual instruction. If you're doing regular maintenance, the emergency jack isn't usually recommended. The spare tire isn't always to the same standard as the stock tires either. In an emergency this might be your only choice but consider better tools and resources for regular maintenance.
- Put the jack in the manuals recommended area to avoid damage while properly and safely lifting the car. Sloped working areas, lifted vehicles, and other factors could make the manufactures emergency jack too short. If this is the case then get the vehicle towed. Do not try to extend or lift up the jack.
- Jack up the car to relieve pressure off the wheel but keep is slightly off the ground. This will help you loosen the lug nuts without the tire spinning on you.
- Remove hub caps if there are any and loosen the lug nuts with the tire iron, turning them counterclockwise.
- Now slightly lift the vehicle up more, just enough to remove the tire.
- Put the spare tire on and tighten the lug nuts. When tightening the lug nuts, use a star formation, tightening clockwise. First get them hand tight and snug before using the tire iron. It's important to use the star formation when tightening the wheel because it puts even pressure around the wheel. Do not over tighten the nuts. You want them tight but don't use too much force.
- When the area is clear, safely and slowly lower the jack on the new wheel and repeat this process if need. If you're doing a rotation more planning is needed because the vehicle might need to be blocked. Check the lug nuts after driving to ensure they're snug and safe. Make sure the tire looks visually straight and there are no other issues.


Star Formation
See the graphic simulating a star formation for tightening a wheel with six lug nuts. Vehicles can range from four to twelve lug nuts. Over tightening the lugs on one side could cause the tire to be unbalanced. This could result in the wheel becoming loose. By tightening them evenly with the wheel fully seated, we can guarantee all the weight is evenly distributed. Once you tighten all the lug nut evenly, start over on the first one and do the formation again. It's not uncommon for them to become loose as the other ones are tightened. Don't over tighten.
-
Jumping Batteries
One of the most common issues for work vehicles is a dead battery. This could happen from an old battery, faulty battery, battery being drained because of something being left on, or a bad alternator (the alternator charges the battery). If the alternator is bad, the vehicle usually won't start after a jump, and if it does it usually won't stay on. Common symptoms of a bad alternator can include engine lights, dim/flickering lights, electrical failures/issues, unusual noises, dead battery, vehicle stalling, or vehicle dies. In the event it's not your alternator, you should be able to jump your vehicle using jumper cables. This is using a healthy vehicle/battery to provide needed power via jumper cables. There are two main safety rules when jumping a vehicle.- Do not touch the negative and positive cable ends at the same time. This could cause you to complete the circuit causing electrical shock or electrocution. This also means not letting the negative and positive ends of the jumper cable touch.
- Make sure both vehicles are turned off and in a safe location before preceding with jumping.
Jumping Process
- Connect the cables as follows:
Red+ on Dead
Red + on Charged
Black - on Charged
Black - on bare metal. - Turn on the vehicle with the good battery. Leave it on for a few minutes so the dead battery can charge.
- Turn on the vehicle with the bad battery and leave it on for a few minutes to continue charging.
- Remove the cables in reverse of how you put them on.
-

-
Understanding Weights
Vehicles are engineered differently to withstand different weight limits. While this includes the drivetrain, it also includes other components of the vehicle that are made heavier duty to withstand more. Pushing your vehicle to the limit with equipment, supplies, workers, fuels, a trailer, and more can be dangerous. Before purchasing a work vehicle, make sure it will withstand the needed workload and towing capacity. Let's look at some weight capacity ratings to consider.
Rating Capacity Vocabulary
Gross Vehicle Weight Capacity (GVWR)
This is the maximum loaded weight of a vehicle to include the passengers and all their supplies. This number is recommended by the manufacture. This number also includes the weight of the vehicle.
Gross Combined Weight Rating (GCWR)
All axles, including trailer axels are weighted to a certain capacity by the manufacture. The front axle rating is known as FR and the rear axle rating is known as the RR. If you're adding a load to a trailer, check the axel rating to be sure the trailer can handle the capacity. This is why they make single, double and triple axel trailers.
Gross Trailer Weight (GTW) This is the weight of the physical trailer and the cargo on it. This is the actual weight of what you're towing, not a rating. This can be found by placing your trailer on a scale. The GTW will help you determine how much weight you're towing to stay in compliance with the GCWR.
Tongue Weight
Tongue weight is the weight of the pressure under the coupler. This is how much weight is sitting on the hitch. Proper cargo placement on the trailer should give you a proper tongue weight of 10-15% of the gross trailer weight. This means keeping the cargo balanced, centered, disbursed, and over the axels. So a 6,000 pound properly loaded trailer should have a tongue weight around 600 pounds. If the load was on the front of the trailer the tongue weight could be in the thousands and if the load was on the back of the trailer, the locked coupler could actually be lifting up the vehicle. Low tongue weights can lead to fishtailing, loss of traction for rear tires, and loss of vehicle control. High tongue weights can also lead to fishtailing, scraping trailers, and jackknifing.
Curb Weight
Curb weight is the weight of the vehicle with any operational fluids needed but no cargo or passengers.
Dry Weight
Dry weight is the vehicle without any cargo, passengers, or operational fluids.
Payload
This is the amount of cargo the vehicle is rated for. -
Trailers
Hooking up
You may need to use a trailer for certain projects. To hook up your trailer first you'll need to back up to it. Do a walk around to make sure there are no people, animals or objects are around. Use a spotter to guide the hitch to the coupler. -

- Back your vehicle up to the trailer using a spotter or by getting out and checking. The trailer jack should be lift enough for the hitch to go directly underneath the couple.
- Once you're in a good position, lower the coupler using the trailer jack safely and slowly onto the hitch. You want your trailer to be be as level as possible when towing, some hitches can be flipped to create a level trailer. Uneven loads could have dangerous consequences. Remember trailer hitches have different ball sizes ranging around 2". You need to have the correct hitch for the trailer coupler and make sure the couple is in the open position. If the hitch is too small the trailer could come loose when towing, and if the hitch is too big, the trailer coupler will not fully latch on. The heavier the trailer/load the more exact you need your coupler over the hitch. Keep your feet and body parts away from the trailer while lowering the jack. Stay clear of pinch points and never kick or hit the trailer to make adjustments.
- Now that the jack is lifted, and the coupler is properly seated on the correct sized hitch you'll need to lock the coupler. When the coupler is in a locked position but the locking pin in. If the coupler won't close or the pin won't go in, check the hitch size, see if the coupler was ever open, or maybe it's not properly seated. Watch for pinch points and use the jack to lift the trailer back up and make adjustments.
- Once the coupler is properly position, locked, and pin in, get the jack into driving position by either lifting it or rotating it out of the way with a locking pin.
- Now you'll need to connect the safety chains to the hitch receiver. Criss-cross the chains over each other before connecting. Make sure the chains won't drag on the ground by twisting them if needed because it's a fire a hazard. The chains are a last resort safety feature to keep the trailer connected to the vehicle in the event of a disconnection.
- Finally plug the electrical system into the vehicle. This will operate trailer lights and breaks, if there are any. If the trailer has breaks then the towing vehicle needs a break controller. The break controller controls how aggressive the breaks are. On a heavier loads you'll want your break controller set to a higher gain and on light loads you'll want it set to lower gains.
- Attach the breakaway switch lanyard if applicable. The breakaway lanyard is a cable attached to the vehicle receiver. If the trailer becomes separated from the vehicle, this system will engage the breaks, bringing the trailer to a stop. Do not attach this to the hitch, chains, electrical system, or any other component of the trailer. This needs to be connected to the receiver on the vehicle.
- Make sure everything is locked, secure, pins are in, and double checked. You should also check to make sure the lights and turn signals are properly working.
Testing Trailer Brakes & Brake Controller
You must adjust your brake controller properly when you're first setting things up or when the weight of your load changes. Once your trailer is properly setup and loaded to the carrying weight, it's time to adjust the brake controller gain. The gain is how much pressure to put on the trailer brake as you push the vehicle brake. Let's look at two scenarios when not setting the brake controller gain.- The gain is too high. You're driving down a steep hill and you suddenly need to stop. You push on the vehicle breaks which also engages the trailer break. The brake pressure was so aggressive that the trailer breaks locked up cause the trailer to bounce and uncontrollable swerve. The trailer overtakes control of the vehicle.
- The gain is too low. You're carrying a heavy load go down a hill and you suddenly need to stop. You push on the vehicle brakes which also engages the trailer brake. You forgot to adjust the gain for the heavy load so the brake pressure isn't slowing down the trailer, however the vehicle brakes are working as normal. Now the trailer weight is pushing into the slowing vehicle causing the trailer to fishtail out of control. The trailer overtakes control of the vehicle.
- Set the gain to a middle setting on the controller.
- Driving the trailer on a flat and paved area around 20-25 mph.
- Push the override button on the controller without touching the vehicle breaks.
- If the brakes don't firmly grip, increase your gain. If the brakes lock up or are too aggressive, then lower the gain.
- Repeat this process until you're comfortable with the gain.
Carrying Water
Carrying water and other liquids is common in the cleaning industry. We need it for projects without water, to supply chemicals, providing purified water, collecting water, and more. Liquids can be really dangerous to tow because of weight and sloshing can throw off the trailer's balance. Liquids are also incredibly heavy and can range in weight based on their density. Water weighs just over 8 pounds per gallon, so 500 gallons would weigh over 4,000 pounds. This is why it's so important to adjust the break controller gain if you're changing your load. When you're towing a liquid it's usually best to try to tow the container full or empty. This will prevent a significant amount of sloshing back and forth. Drive slow when you have this extra weight and realize it will take you a longer time to completely stop. When towing liquids and chemicals, check with the Department of Transportation (DOT) for any regulation you may need to follow.
Towing
Safety with vehicles is always number one. Let's look at some practices we can look at to keep ourself and others safe on the road.- Use a spotter or backup cams when backing up or if need you extra eyes.
- Make sure everything is locked, secure, pins are in, and double checked.
- Check to make sure the lights and turn signals are properly working.
- Test your trailer brakes by adjusting the gain.
- Take wider turns to avoid hitting sidewalks and other obstacles.
- When backing up your trailer remember the trailer will move in the opposite direction of your steering. Backup slow so you can make adjustments as needed.
- Keep weight centered, balance, and over the trailer axle(s).
- Make sure all trailer components are compatible.
- Keep fingers and toes away from pinch points.
- Never kick or push the trailer to adjust it.
- Check the tire pressure on the trailer.
- Check your mirrors to make sure you have good visibility.
- Cary wheel chocks to block tires and safety cones.
- Drive slower with trailers and keep a larger distance to the vehicle in front of you.
Spotters
Work vehicles can become additional hazards because of equipment hanging on/off them, or having limited sight due to size or vinyl logo wraps. Chances are you're working on someone else's property and they may not know when you're coming and going. A back over could be an incredibly dangerous or deadly scenario. Before leaving you should do a walk around the vehicle. Make sure everything is properly tied down, there are no bystanders around (especially children), no pets and look for any hazards that could be easy to back into or have limited visibility. Communicate with anyone in the area to make sure they know you're backing up or moving the vehicle.
Backovers happen for a number of reasons. Bystanders could be unaware that a vehicle is backing up. If they're in the drivers blind spot, then it could easily result in an accident. If the area is loud, then a bystander might not hear the vehicle moving or any backing up alarms. A spotter might not notice another vehicle move behind him while focusing on the vehicle they're spotting. A driver could make the assumption that the area is clear. Video cameras and collision detection alerts are great features on newer vehicles with limited visibility. Try to avoid backing up altogether by pulling through in a parking lot or parking in an area that won't require you to back up.
You can avoid back overs by using a spotter. A spotter is someone who stands behind the vehicle using hand or verbal communication to communicate with the driver. Spotters are a proven method of employees on foot to help vehicles with an obstructed view back up. Spotters themselves can be at risk for injury or even death. Implement the following actions to help keep spotters. drivers. and bystanders safe:- Spotters and drivers agree on hand signals before backing up.
- Spotters and drivers always maintain visual contact with each other.
- Driver stops immediately if they lose visual contact of spotter.
- Spotter has no additional task while spotting.
- Spotter doesn't use phones, headphones, or other items while spotting, unless talking to driver.
- Spoffer is in high visibility clothing.
- Spotters and drivers are aware to other moving traffic.


-
Blind Spots
Blind spots are an every day part of driving. If you're in the blind spot of another vehicle then either slow down or speed up to get out of it. The blind spots happen when a driver cannot see another driver behind them through their mirrors. If the driver believes the area is clear and changes lanes this could cause a serious accident. You can manage this hazard by avoiding blind spots of other drivers and checking your blind spots through your windows before preceding with a lane change. If either vehicle has a trailer, this situation can get significantly more dangerous, since it's harder to quickly maneuver towing vehicles safely. -


-
Maintenance
All vehicles require maintenance, especially work vehicles. Vehicle maintenance starts with you taking care of things daily such as cleanliness, removing trash, following safety guidelines, thorough inspections, and documentation.
Oil
Checking, adding, and changing oil is the most common type of maintenance on a vehicle. Maintaining your oil will help your vehicle in the short, and long term. Oil lubricates all the moving parts of the engine so it is imperative for smooth operation.
Oil Check
You should check your oil regularly to know the condition of your vehicle. Your engine needs to be cool and parked on level ground for an accurate reading. If you're unsure of the vehicles temperature, turn the key to on without starting it and see what the temperature gauge says. Now pop the hood of your car. To check your oil you'll need to find the dip stick. The dip stick is a measurement device used to measure the amount of oil in the engine. Dip sticks can be used for many different liquids, so make sure you're pulling the correct one by reading labels.Pair text with an image to focus on your chosen product, collection, or blog post. Add details on availability, style, or even provide a review.
-

-

Changing Your Oil
After you've check your oil and read your dipstick, it might be time to change the oil. Even if you know you're ready for an oil change, you should still properly check your oil. This could alert you to an oil leak or let you know if you're doing it too soon or late. Prepare the following to get read to change your oil. The proper oil type and oil filter can be found in an index at the auto parts store or in your manual. Follow the recommended oil filter and type. Depending on the vehicle, it may need to be lifted for safe access to the oil drain plug and oil filter. Follow manufacture instructions for safely lifting the vehicle. Note: Be sure you're draining and replacing oil, not another fluid. Worker's have drained the transmission fluid and doubled and the oil on accident causing mechanical failures -

Before you get started make sure you have your PPE, supplies, tools, and manufacture directions. Get everything ready beforehand in case your hands get dirty. Your vehicle should be in a safe location, cool motor, and on flat ground.
- Open the hood and jack the vehicle up (if needed). Use jack stands under the vehicle and block the wheels so it can't roll.
- Unplug the oil drain plug bolt and let it drain into the oil pan. Once this drainage has slowed down then remove the oil fill cap (not oil filter), this will allow the rest of the oil to drain out, similar to a straw suction.
- Once the oil has drained out, you'll need to remove the oil filter. This will unscrew counter-clockwise. It's important to keep the filter upright because during removal to avoid a mess because it's filled with oil. Slowly lay the oil filter into the oil pan so it can drain out.
- Now put the bolt back into the drain hole. Before putting the new oil filter on, put some clean oil on the oil filter gasket (small rubber seal) to allow the seal to suction without bunching up.
- Now that the old oil is drained, the drain bolt is in, and the new filter is on, you're ready to put new oil into the truck. Fill the oil to the manufacture's specified recommendations with the proper weighted oil. Use a funnel if needed.
- Check the oil level, and check under the vehicle for any leaks.
- Properly recycle all oil and supplies immediately and clean the area.


If you feel you have a full understanding of this module, proceed to the test. Once you complete the test, you will be redirected back to the main module page.